Know your enemy
Malware, or malicious software, stands for a broad range of applications designed to harm your computer or use it to do damage elsewhere. Malware comes in different shapes and sizes including viruses, Trojan horses, spyware, and others, all of which most users try to avoid like the plague, especially if they store work or private information on their PCs. Some malware applications encrypt your files and demand payment before decrypting them back; some send copies of your desktop files or screen captures to other destinations; yet others use your machine to circulate unauthorized or illicit information or launch attacks on other networks. None of these spell anything good for you.
In the pre-Internet era, malware was distributed mainly via physical storage containing all the code needed to do the bad deed. Modern malware, however, uses a two-stage process to infect your computer. First, you are tricked into downloading a small and virtually harmless downloader application; for example, by clicking on a legitimate-looking link from your email. This downloader is what downloads and installs one, two, or a hundred real malware programs from the Internet, which then cause the real harm.
While this working method is effective, it is malware’s soft spot at the same time. As both stages of the process require an Internet connection, appropriate Internet access administration is a potent way to fight malware. You can dramatically enhance the security of your PC simply by allowing Internet access only for applications that you trust and actually need to work with. How do you do that? That’s what we’re going to talk about in this post.
What weapons to choose?
Before going any further, let’s check to see if you actually need to do anything. Are you lucky enough to be working in a highly-regulated company network, where all traffic is monitored by professional security software utilizing the latest virus definitions from well-known vendors, where Internet access is granted only to a strictly maintained list of client applications? Then you have nothing to worry about. However, if your employer has not implemented robust security procedures, or if you’re on your own, then PC security is a concern for you.
The easiest and most effective method of protection is a local firewall—a security system that monitors and controls traffic. There are quite a few firewall solutions available on the market today, which vary greatly in functionality, user-friendliness, and pricing. While the price tag may be a deterrent for some users, there’s a more pressing concern: that some of these applications may actually function like spyware themselves.
This applies particularly to free software, though you can never be a 100% sure even with paid products. For example, see Bloomberg on Kaspersky products. Technically, this should not be all that surprising. Antivirus and firewall software enjoys the most extensive access privileges on your PC; it can freely transfer your data to the software vendor’s servers, download any updates, and access user files, Internet traffic, and RAM and video memory. Its job is not that different from spying to begin with. So, if some security software serves some harmful purposes under the counter, you cannot really tell.
So what’s your best course of action? If you’re using Microsoft Windows, the answer is pretty straightforward. All instances of Windows come with a built-in local firewall which is free and fairly easy to configure.
It’s true that we cannot be absolutely sure that Windows Firewall does not spy on its users. But hey, you’ve already installed Windows, so you’re pretty much 100% committed to Microsoft. If the corporation is spying on you already, using one more application will not make a huge difference. This is why we’ll focus on how Windows Firewall works and how you can get the most out of it.
Disable & Enable
By default, Windows Firewall allows Internet access for all outbound traffic. This means that any software installed on your machine can transfer and receive data over the Internet. Your first order of business then is to disable Internet access for all applications except for those you trust.
Windows Firewall may be configured either via its GUI (Graphical User Interface) or from the command line. The latter is especially useful for creating distributable batch files designed to apply predefined settings on multiple computers. (This works for networks where all PCs are connected to a domain; there are more efficient ways to distribute policies, but that’s beyond the scope of this post.) We’ll cover both methods.
First, you’ll need to create a rule that will disable Internet access for all software. To do this via the Firewall GUI:
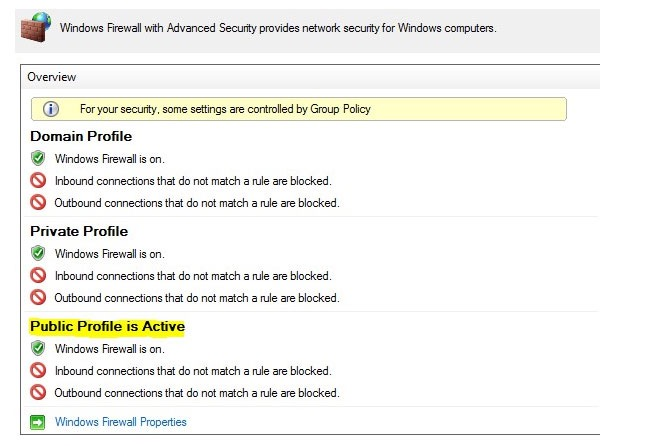
- Open Windows Firewall snap-in with Advanced Security and select the active profile on the main screen:
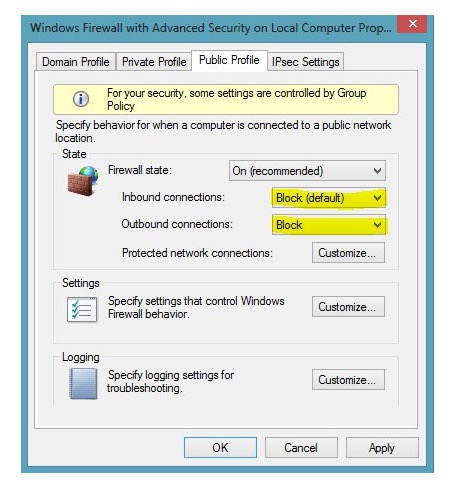
- Select ‘Actions’ and then click ‘Properties’:
- In the dialog that opens, for both ‘Inbound connections’ and ‘Outbound connections,’ select ‘Block’ from the drop-down list:
To set up a rule that disables traffic from the command line, run the following command:
Set-NetFirewallProfile -all -DefaultInboundAction Block -DefaultOutboundAction Block
After applying this rather harsh rule, you will need to make certain exceptions: first for applications that need to access the Internet, and then for shared folders on your PC.
Software that needs to access the Internet includes web browsers such as Internet Explorer, Google Chrome, or Mozilla Firefox. Let’s set up at a Firewall exception for Internet Explorer as an example.
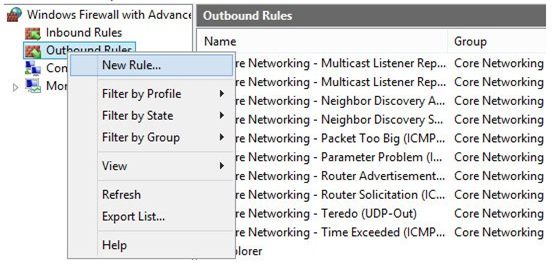
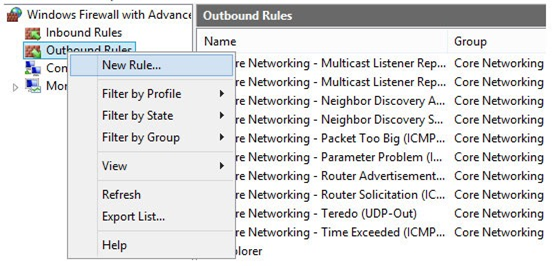
- In the Windows Firewall snap-in, right-click on ‘Outbound Rules’ (we’ll be working with outbound traffic from now on) and then click ‘New Rule’:
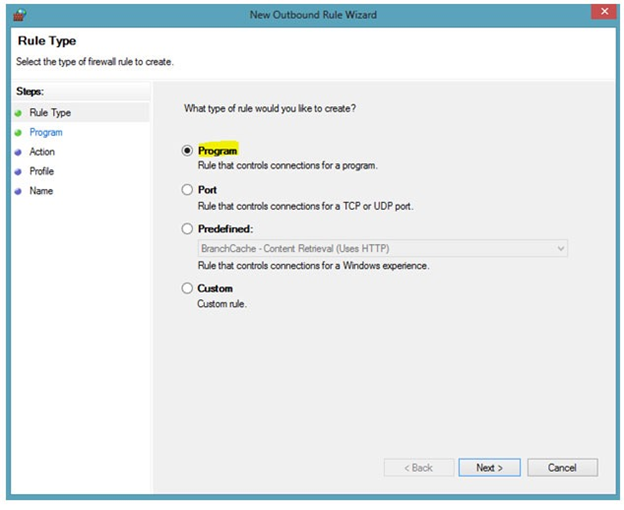
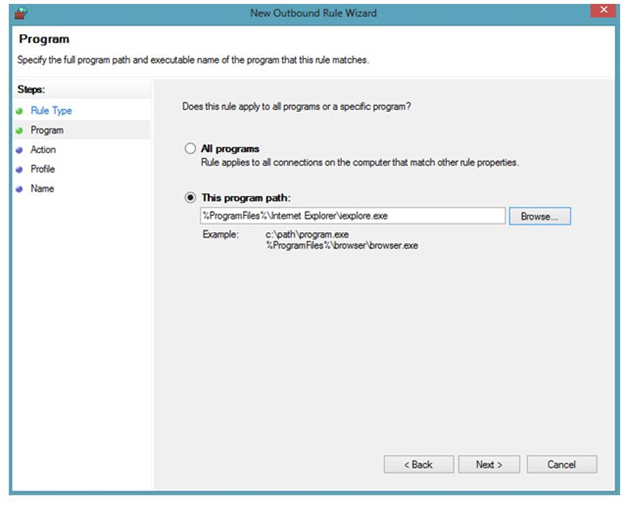
- On the next screen, click the ‘Program’ radio button:
- Provide a path to the executable, which in our example is the Internet Explorer executable:
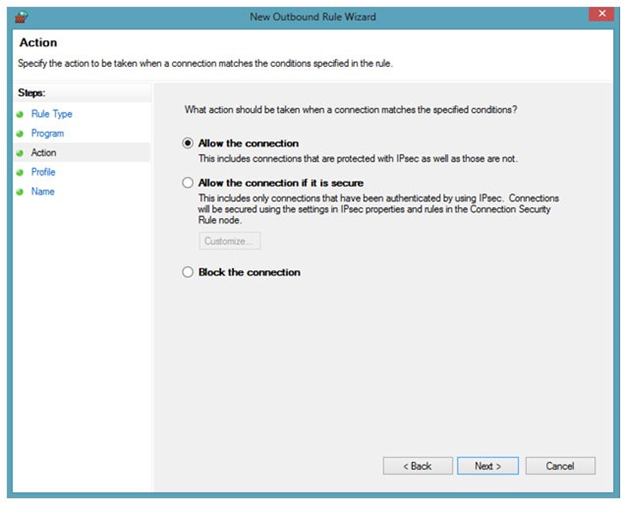
- Select ‘Allow the connection’:
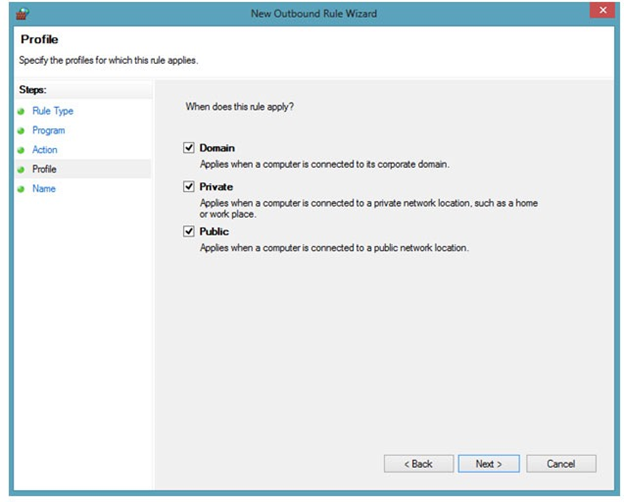
- Select the profile(s) to which this rule will apply. All network profiles are selected by default:
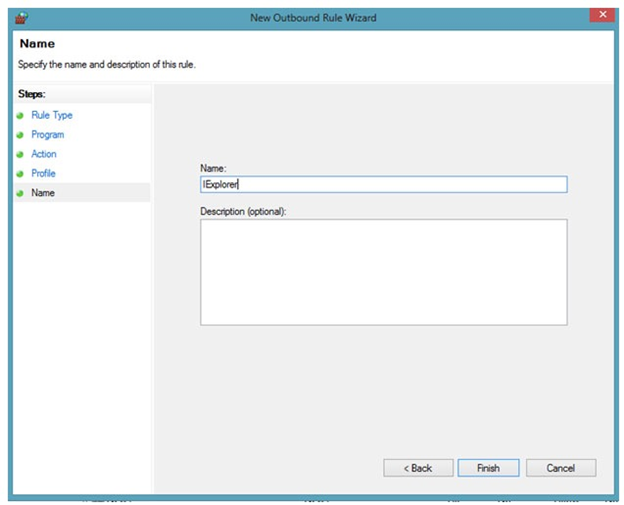
- Enter a name for this rule:
To enable outbound traffic for Internet Explorer from the command line, run the following commands:
netsh advfirewall firewall add rule name="Internet Explorer" dir=out action=allow program="%ProgramFiles% (x86)\Internet Explorer\iexplore.exe" enable=yes
You can follow a similar process to enable outbound traffic for other browsers like Chrome or Firefox, and for other applications such as Skype (see the script at the end of this post).
Since web browsers also need to stay updated to work in a stable manner, we also need to create separate exceptions for browser update processes. If you use the Windows Firewall GUI, simply rinse-and-repeat as above. If using the command line, sample commands are given below:
netsh advfirewall firewall add rule name="Chrome Update" dir=out action=allow program="%ProgramFiles% (x86)\Google\Update\GoogleUpdate.exe" enable=yes
netsh advfirewall firewall add rule name="Mozilla Firefox Updater" dir=out action=allow program="%ProgramFiles% (x86)\Mozilla Firefox\updater.exe" enable=yes
As Internet Explorer ships with Windows, you should also allow Internet access to Windows updates, by running the following commands:
netsh advfirewall firewall add rule name="SVCHOST" dir=out action=allow program="%SystemRoot%\System32\svchost.exe" enable=yes
netsh advfirewall firewall add rule name="WUAC" dir=out action=allow program="%SystemRoot%\System32\wuauclt.exe" enable=yes
Now let’s talk about enabling access to shared folders. To do so via the GUI:
- Create a new rule:
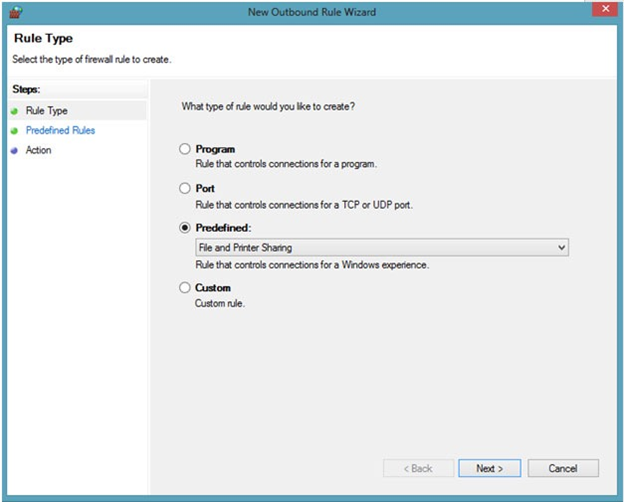
- Click the ‘Predefined’ rule type and select ‘File and Printer Sharing’ from the drop-down list:
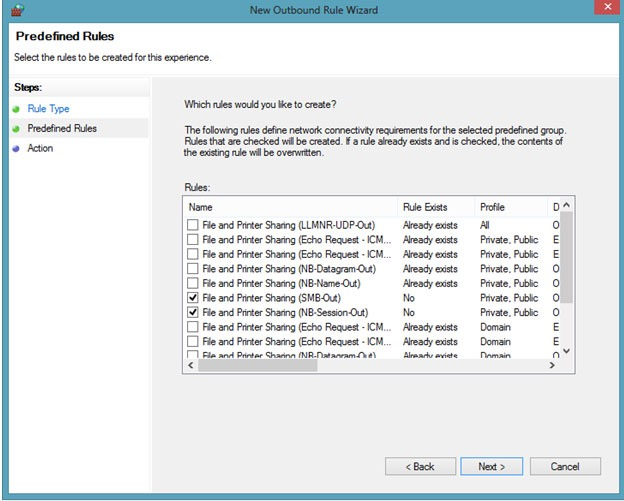
- Select the check-boxes ‘File and Printer Sharing (SMB-Out)’ and ‘File and Printer Sharing (NB-Session-Out)’:
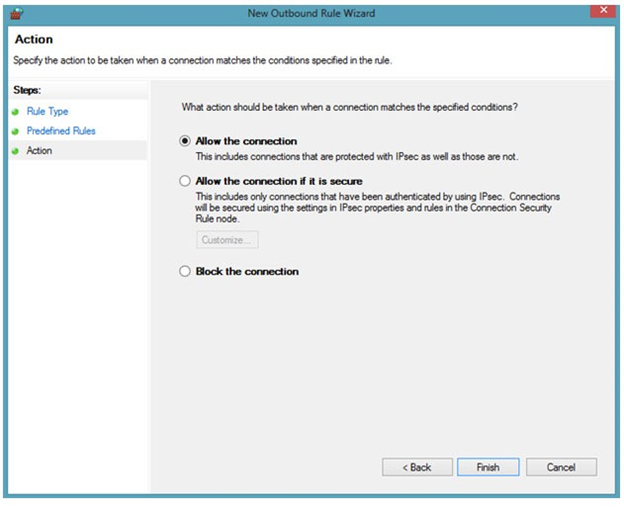
- Allow the connection and then click Finish:
To do the same from the command line, run this:
netsh advfirewall firewall add rule name="File and Printer Sharing (NB-Session-Out)" new dir=out profile=any action=allow enable=yes remoteip=any remoteport=139 protocol=TCP program="System"
netsh advfirewall firewall add rule name="File and Printer Sharing (SMB-Out)" new dir=out profile=any action=allow enable=yes remoteip=any remoteport=445 protocol=TCP program="System"
Transferring settings from one PC to another
Now you know enough to put all these settings in a PowerShell script that can be copied from one computer to another and applied instantly. Here’s a typical script that configures everything we’ve covered above, and a few other useful things:
Set-NetFirewallProfile -all -DefaultInboundAction Block -DefaultOutboundAction Block

netsh advfirewall firewall set rule all new enable=no

netsh advfirewall firewall add rule name="All ICMP V4 - OUT" protocol=icmpv4 action=allow dir=out

netsh advfirewall firewall add rule name="Chrome" dir=out action=allow program="%ProgramFiles% (x86)\Google\Chrome\Application\chrome.exe" enable=yes

netsh advfirewall firewall add rule name="Chrome Update" dir=out action=allow program="%ProgramFiles% (x86)\Google\Update\GoogleUpdate.exe" enable=yes

netsh advfirewall firewall add rule name="Explorer" dir=out action=allow program="%SystemRoot%\explorer.exe" enable=yes

netsh advfirewall firewall add rule name="Internet Explorer86" dir=out action=allow program="%ProgramFiles% (x86)\Internet Explorer\iexplore.exe" enable=yes

netsh advfirewall firewall add rule name="Internet Explorer64" dir=out action=allow program="%ProgramFiles%\Internet Explorer\iexplore.exe" enable=yes

netsh advfirewall firewall add rule name="Java Web" dir=out action=allow program="%ProgramFiles% (x86)\Java\jre1.8.0_25\bin\javaw.exe" enable=yes

netsh advfirewall firewall add rule name="Mozilla Firefox" dir=out action=allow program="%ProgramFiles% (x86)\Mozilla Firefox\firefox.exe" enable=yes

netsh advfirewall firewall add rule name="Mozilla Firefox Updater" dir=out action=allow program="%ProgramFiles% (x86)\Mozilla Firefox\updater.exe" enable=yes

netsh advfirewall firewall add rule name="MSTSC" dir=out action=allow program="%SystemRoot%\system32\mstsc.exe" enable=yes

netsh advfirewall firewall add rule name="Outlook" dir=out action=allow program="%ProgramFiles%\Microsoft Office\Office15\OUTLOOK.EXE" enable=yes

netsh advfirewall firewall add rule name="Skype" dir=out action=allow program="%ProgramFiles% (x86)\Skype\Phone\Skype.exe" enable=yes

netsh advfirewall firewall add rule name="SVCHOST" dir=out action=allow program="%SystemRoot%\System32\svchost.exe" enable=yes

netsh advfirewall firewall add rule name="TeamViewer" dir=out action=allow program="%ProgramFiles% (x86)\TeamViewer\TeamViewer.exe" enable=yes

netsh advfirewall firewall add rule name="File and Printer Sharing (NB-Session-Out)" new dir=out profile=any action=allow enable=yes remoteip=any remoteport=139 protocol=TCP program="System"

netsh advfirewall firewall add rule name="File and Printer Sharing (SMB-Out)" new dir=out profile=any action=allow enable=yes remoteip=any remoteport=445 protocol=TCP program="System"

netsh advfirewall firewall add rule name="Edge22" dir=out action=allow program="%SystemRoot%\SystemApps\Microsoft.MicrosoftEdge_8wekyb3d8bbwe\MicrosoftEdgeCP.exe" enable=yes

netsh advfirewall firewall add rule name="Edge11" dir=out action=allow program="%SystemRoot%\SystemApps\Microsoft.MicrosoftEdge_8wekyb3d8bbwe\MicrosoftEdge.exe" enable=yes

netsh advfirewall firewall add rule name="Outlook16" dir=out action=allow program="%ProgramFiles%\Microsoft Office\root\Office16\OUTLOOK.EXE " enable=yes

netsh advfirewall firewall add rule name="lync16" dir=out action=allow program="%ProgramFiles%\Microsoft Office\root\Office16\lync.exe" enable=yes
A script like that can be written in any word-processing software and saved as a .ps1 file. Running a PowerShell script is a bit trickier though, as it requires Administrator permissions. For this reason it’s easier to create and run a batch (.bat) file instead. UAC will automatically prompt you to confirm these permissions. Here’s what your .bat file should look like:
@echo off
cls
echo Rules of Firewall
echo.
echo press any key to continue...
pause > NUL
echo Rules of Firewall
echo.
PowerShell -NoProfile -ExecutionPolicy Bypass -Command "& {Start-Process PowerShell -ArgumentList '-NoProfile -ExecutionPolicy Bypass -File ""%~dp0.\firewall.ps1""' -Verb RunAs}"
echo Rules included in Firewall...
echo.
pause
where firewall.ps1 – is the name of the .ps1 file you created that contains the PowerShell commands.
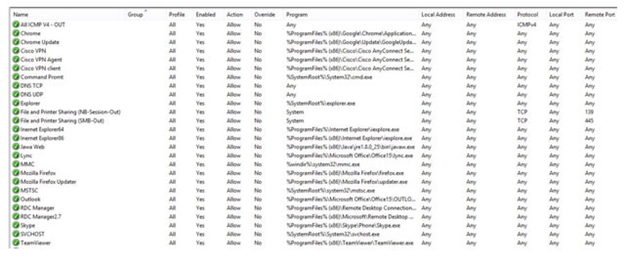
After the script runs and finishes successfully, the added rules will be displayed in Windows Firewall looking something like this:
Is it really that simple?
Well, not quite. Raising the security level may lead to issues such as the following:
1. If there are any other existing rules in your system, running this script will disable them.
2. Not all services have an easily identifiable executable file. In fact, some executables run others in chain order, making it difficult to determine which one you need to specify in your rule. This may turn out to be quite complicated, even if you use special-purpose utilities like Process Explorer or Network Monitor. A good example is the Windows SmartScreen service whose operation involves running both Windows Explorer and a web browser.
3. By enabling access to specific applications, we’re not making exceptions for any given protocol, but instead allowing unrestricted access for that particular executable. This would limit the operation of service protocols, forcing us to create special additional rules for them.
To successfully resolve these issues and ensure all-around security, you may need to delve deeper into how various applications work on your PC. There are quite a few resources on the Internet that you can consult in this effort (unless you’ve disabled that in your Firewall!). By all means, try to do so and educate yourself—more power at your fingertips! If at any point you don’t feel like it, you’re welcome to contact us for help with your PC security.


